How to Create Bootable USB Drives with PowerISO


Asif Mohammad Sovon
Asif Mohammad Sovon, IT Assistant at Bangladesh Air Force and Fileion tech writer, simplifies tech t...
Step-by-Step Guide: How to Create a Bootable USB Drive with PowerISO
Is PowerISO free to use for bootable USB creation?
Can PowerISO create a bootable USB for Linux?
What USB file system should I use before writing with PowerISO?
How do I boot from the USB after creating it with PowerISO?
Does PowerISO support creating bootable USB drives for Windows 11?
Your computer refuses to boot. Or maybe you need to install a fresh operating system on a new machine. Either way, you need one thing: a bootable USB drive.
Most people stop here. They search for tools, find confusing options, and give up.
PowerISO makes this process simple. It is one of the most trusted ISO tools available, and it handles bootable USB creation without any hassle.
In this guide, you will learn exactly how to create a bootable USB drive using PowerISO. From setting up the software to writing the image, every step is covered clearly.
Let's dive into the basics before moving to the hands-on steps.
What is PowerISO?
PowerISO is a disk image utility that lets you create, edit, convert, burn, and mount ISO files. It also includes a dedicated feature for writing bootable ISO images directly to USB drives.
Students use it to install operating systems for lab setups. IT professionals use it for system recovery and deployment. Home users rely on it to reinstall Windows or try Linux distributions.
The end result is a USB drive that your computer can boot from, just like a physical installation disc.
Key Features
-
The tool handles ISO, BIN, NRG, IMG, DAA, and many other image formats. You do not need to convert files before using them.
-
You can open, edit, and convert disk image files directly inside PowerISO. This is useful when you need to modify an image before creating a bootable drive.
-
PowerISO can mount up to 23 virtual drives on your system. This means you can open and explore ISO contents without writing them to a disc or USB.
-
PowerISO supports compressing image files to save space and adding password protection for sensitive content.
Step-by-Step Guide: How to Create a Bootable USB Drive with PowerISO
-
Download and install PowerISO from Fileion. Run the installer and follow the on-screen prompts. The installation takes less than a minute on most systems.
-
Obtain a valid ISO file for the operating system you want to install. Download it from the official source, such as the Microsoft website for Windows or the distribution website for Linux. Make sure the file is complete and not corrupted.
-
Insert your USB drive into an available port on your computer. The USB drive should have at least 8 GB of storage for most operating systems. Back up any files on the USB before proceeding, as the process will erase all existing data.
-
Open PowerISO on your computer. You will see the main interface with a toolbar at the top and a file browser below.
-
Click on "Tools" in the top menu bar. A dropdown list will appear with several options. Look for "Create Bootable USB Drive" and click on it.
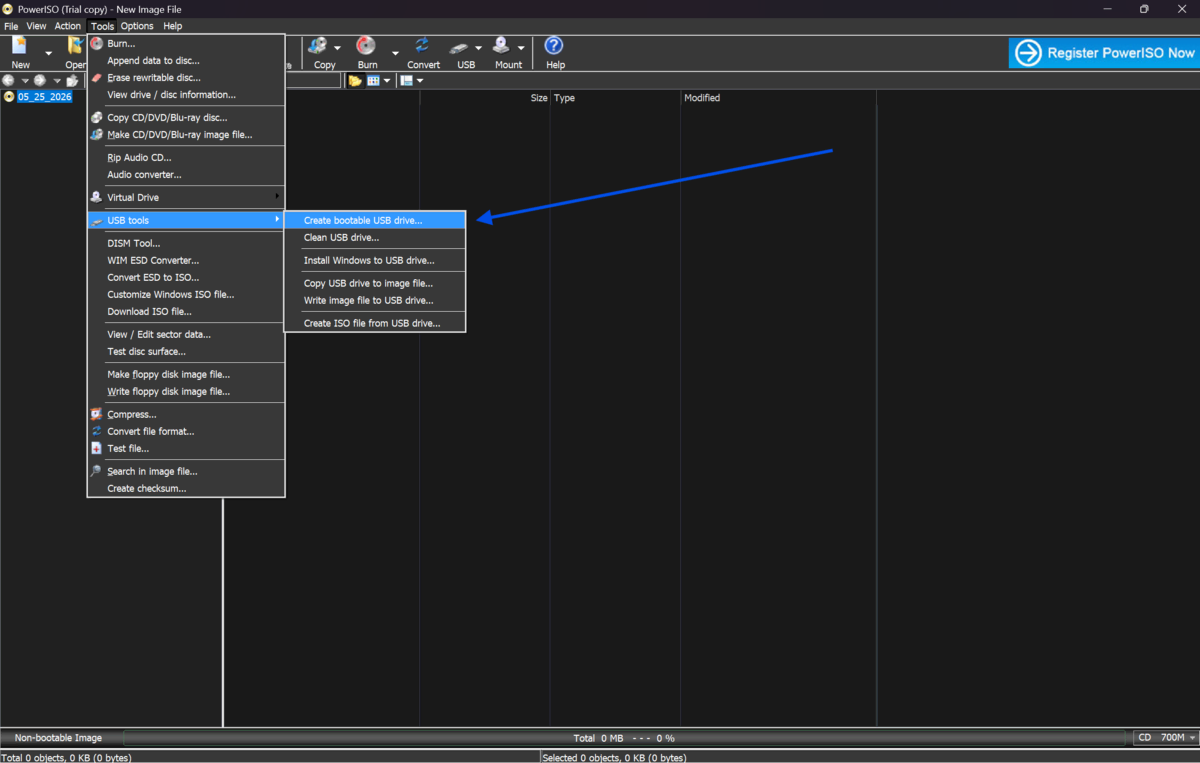
-
Select the ISO file in the dialog box that opens. Click the folder icon next to the source field and browse to the location where your ISO file is saved. Select the file and click Open.
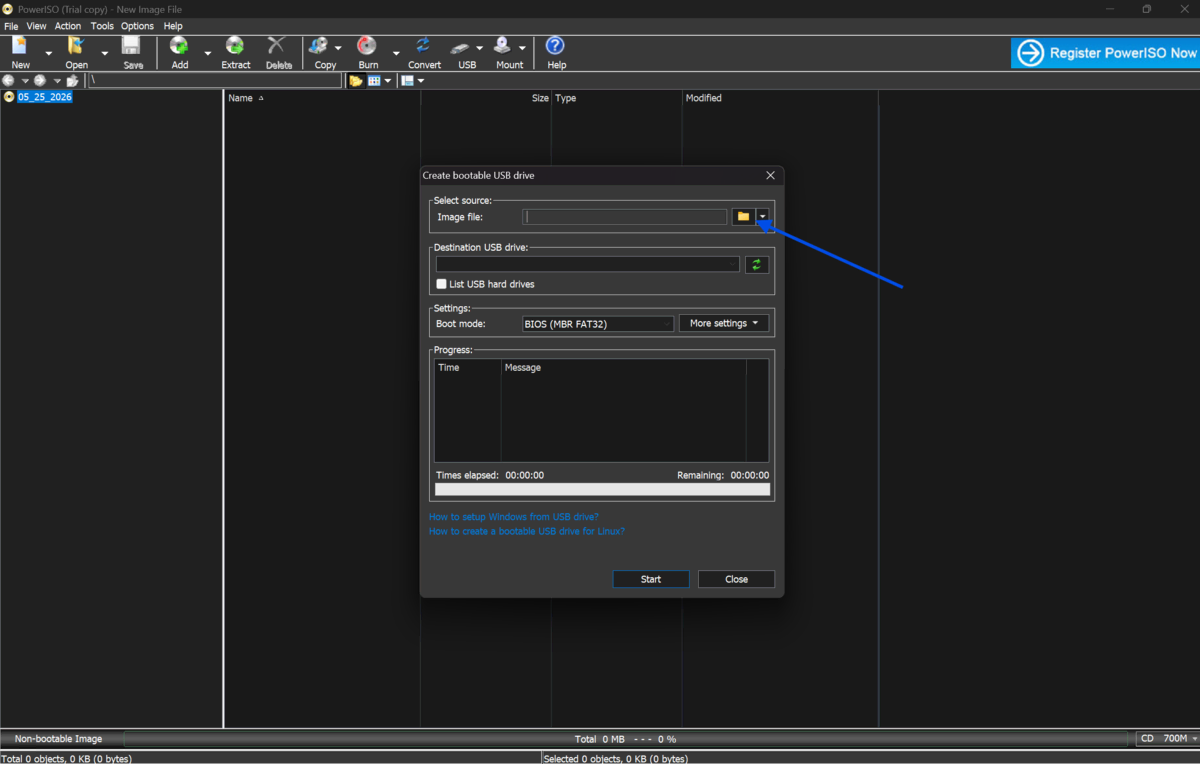
-
Choose your USB drive from the destination dropdown menu. PowerISO will list all connected USB devices. Make sure you select the correct drive to avoid writing to the wrong device.
-
Select the write method. For most Windows ISO files, keep the default setting. For Linux distributions or other systems, PowerISO may automatically detect the correct writing method. If prompted, choose "USB-HDD" for maximum compatibility.
-
Review the settings before proceeding. Confirm that the source ISO path, the destination USB drive, and the writing method are all correct. Double-check the USB drive letter to be sure.
-
Click "Start" to begin the process. A confirmation prompt will warn you that all data on the USB drive will be deleted. Click "OK" to confirm and start writing.
-
Wait for the process to complete. PowerISO will show a progress bar as it writes the ISO to the USB drive. This can take anywhere from 5 to 20 minutes, depending on the ISO file size and USB speed. Do not remove the drive during this time.
-
Eject the USB drive safely once PowerISO confirms the process is complete. Your bootable USB drive is now ready. You can use it to boot any compatible system by selecting it from the BIOS or UEFI boot menu.
Quick Tips
-
Always download ISO files from official or verified sources. Corrupted or unofficial ISO files can cause boot failures.
-
Use USB 3.0 drives when possible. They write faster and perform better during installation.
-
If your computer does not detect the USB on boot, enter BIOS or UEFI settings and manually set the USB drive as the first boot device.
-
Keep a spare bootable USB ready with a recovery tool. It saves time in emergencies.
Common Mistakes to Avoid
-
Creating the bootable USB is only half the task. If you do not set the USB as the primary boot device in BIOS, your computer will boot from the internal drive instead. Access BIOS by pressing F2, F12, Del, or Esc during startup, depending on your system.
-
Old or cheap USB drives can cause write errors or produce unstable bootable media. Use a reliable, well-known brand for the best results.
-
Removing the USB or shutting down the computer during writing will corrupt the drive. Always let the process finish before touching anything.
Pricing and Availability
PowerISO is available for Windows and offers a free version with limited functionality. The free version allows file sizes up to 300 MB, which is not sufficient for most OS ISO files.
A personal license for the full version is a one-time purchase, which costs $39.95. It supports lifetime use with free updates for the purchased version. There is no recurring subscription fee.
PowerISO is compatible with Windows XP through Windows 11. A separate version is available for Linux users via command-line tools.
Final Verdict
PowerISO is a reliable, lightweight, and precise tool for creating bootable USB drives. It handles the technical steps behind the scenes, so you can focus on getting your system ready.
Whether you are reinstalling Windows, setting up a Linux environment, or preparing recovery media, PowerISO gets the job done without unnecessary complexity.
It works well for beginners who want a no-fuss process and for professionals who need dependable utility in their toolkit. The one-time pricing model also makes it a better long-term value compared to subscription-based alternatives.
If you are ready to create your first bootable USB drive, download PowerISO from our site today and follow the steps in this guide. You will have a working bootable drive in under 20 minutes.
FAQs
Is PowerISO free to use for bootable USB creation?
PowerISO offers a free version, but it limits the ISO file size to 300 MB. Since most operating system images are larger than that, you will need the paid version to create bootable USB drives for OS installations.
Can PowerISO create a bootable USB for Linux?
Yes. PowerISO supports Linux ISO files from distributions such as Ubuntu, Fedora, Debian, and others. The process is the same as creating a Windows bootable USB. Select the ISO and write it on the USB drive.
What USB file system should I use before writing with PowerISO?
PowerISO handles the formatting automatically during the write process. You do not need to manually format the USB drive beforehand. However, if you encounter errors, formatting the drive as FAT32 using Windows Disk Management and then retrying can help.
How do I boot from the USB after creating it with PowerISO?
Restart your computer and press the BIOS key during startup. This is usually F2, F10, F12, or Del, depending on your motherboard. Inside BIOS or UEFI, navigate to the boot order settings and move the USB drive to the top. Save the settings and restart to boot from the USB.
Does PowerISO support creating bootable USB drives for Windows 11?
Yes. PowerISO fully supports Windows 11 ISO files. Download the official Windows 11 ISO from Microsoft and use PowerISO to write it to a USB drive. Make sure the USB drive is at least 8 GB and that your target system meets Windows 11 hardware requirements.
Comments
Let us know about your thoughts
Explore more articles related to PowerISO
Here you will find all the latest tips and tricks about PowerISO . Also you will get many solution of problems which you may face while using this app.
Published at: Mar 17, 2026
How to Compress ISO Files Using PowerISO
You just downloaded a massive ISO file. It's eating up your storage. And you need...
Published at: Apr 12, 2026
How to Edit ISO Files Without Extracting Them in PowerISO
You have an ISO file. You need to change one file inside it. But you do...
Published at: Apr 12, 2026
How to Mount ISO Files Using PowerISO
You downloaded a game, software installer, or operating system image. The file ends in .iso. Now...

Published at: Apr 17, 2026
How to Extract ISO Files Using PowerISO Without Errors
You downloaded an ISO file. Now what? Most users stare at the iso file and...

Published at: Apr 18, 2026
How to Convert BIN to ISO Using PowerISO
You have a BIN file on your desktop. You try to mount it. Nothing works. Sound...

Published at: Apr 20, 2026
How to Burn ISO to USB or DVD Using PowerISO
You just downloaded an ISO file. Maybe it is a Windows installer, a Linux distro,...


Mount. Burn. Done.
PowerISO is a safe and powerful ISO toolkit that lets you open, edit, compress, and mount disc image files with ease. From creating bootable USBs to backing up old CDs or running virtual drives, it handles it all. Simple yet feature-rich, it’s the go-to choice for managing ISO files.